Thanksgiving is one of our favorite times of the year. Unlike most people, however, it’s not the food that gets us excited… It’s the decorating. We love everything about getting geared up for the holidays. But it can get expensive to buy pre-made decorations to use around the house. In this post, we’ll take a look at putting together your own DIY Thanksgiving holiday wreath for all of our fellow “do it yourself-ers” out there! It’ll be the perfect welcome decoration to hang on your front door, above the fireplace, or near the dinner table.
Supplies Needed:
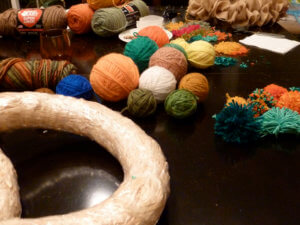
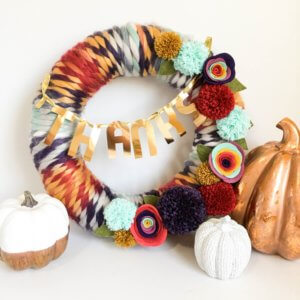
Photo Courtesy of Design Improvised
- Chunky yarn in fall colors (if you really want your project to stand out, try using yarn with loops in it for a more textured look!)
- Foam circular wreath base
- Hot glue gun and glue
- Scissors
- Embellishments (leaves, pumpkins, floral pics, ribbon, etc.) – optional
Instructions:
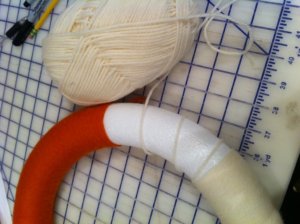
- To begin assembling your DIY Thanksgiving wreath, start by taking the yarn and tying it to the foam wreath base so that you have a secure anchor point. From there, continue wrapping the yarn through the middle and around the base until you make it all the way around and back to where you began. If you’d like to be more creative, you can choose multiple colors of yarn, and arrange them in a pattern of your choosing. The important thing to remember here is that you’re looking to cover all of the wreath’s foam underlayer with yarn. Using a tight coil vs. a loose coil when winding your yarn around can also impact the final look and feel of the piece. Feel free to customize to your liking.
- Once finished wrapping the yarn around the foam wreath base, secure your work by tying a knot at the end of each separate strand you used. Go ahead and cut any excess yarn that’s sticking out, so that your project looks clean and uniform. Tucking the knots underneath the yarn strands will further ensure that it’s out of sight.
- After completing steps one and two, you should be left with a beautiful base covered with the customized yarn pattern of your choosing. Now is the time to add the final touches of Thanksgiving cheer to your piece! With a hot glue gun, go ahead and take the leaves, floral pics, or other decorative components you set aside at the beginning, and secure them to the wreath. The best part about “do it yourself” projects is that you can craft your homemade decorations exactly how you want them to be, instead of relying on a store-bought design. Feel free to cover the wreath in as many or as few decorations as you’d like. We’ve found that a popular rule of thumb is to utilize about a third of the wreath for this purpose. Once finished, glue a final piece yarn or ribbon to the back as a catch for a hook, and hang.

Photo Courtesy of Digs Digs
In Pinspiration’s Main Studio, you can create your own Thanksgiving wreath with ease. With a variety of yarn, embellishments, and all necessary supplies provided, Pinspiration has got you covered for all of your DIY holiday wreath needs – plus, let us worry about the mess and clean-up! All you need to think about is where you’re going to display it – book an appointment at pinspiration.com