As one of the most used rooms in your home, bathrooms can tend to quickly become messy and disorganized. However, there is no need to stress! There are so many aesthetic but functional ways to both organize your belongings and transform your bathroom into a room you actually want to spend time in.
Here is a list of our favorite DIY bathroom organizers:
1. Jar Crate
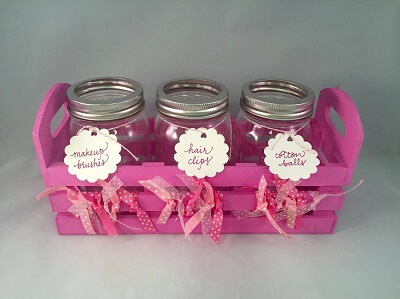 Keep all your stuff organized with this fun but practical jar crate caddy. These mason jars are great for organizing or displaying a variety of bathroom essentials such as cotton balls, hair ties, toothbrushes, etc. The item possibilities and combinations are endless! To create your own mason jar crate, all you’ll need are:
- Three mason jars
- A wooden caddy
- Paint
- Any desired embellishments (such as buttons, glitter, ribbon, lettering, paper tags, labels, etc.)
To start, paint your caddy to whatever shade you desire. You can match your caddy to your bathroom’s color scheme or stick to painting it a neutral or metallic color.
While the caddy’s paint is drying, decorate your mason jars. This step is completely customizable to your specific aesthetic. You can paint your mason jars or simply stick on labels or tags to designate the contents of each jar. However, if you decide to paint your jars, make sure they are completely dry before assembling the crate. To finish, simply fill the jars with whatever you desire. Display the crate on your sink countertop or bathroom shelf.
2. Toilet Tank Tray
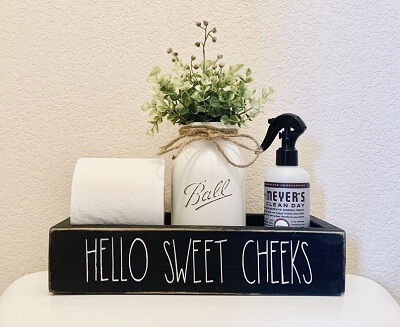
Who says your toilet doesn’t need a little loving? Utilize the space above your toilet for this decorative yet functional bathroom organizer. To make your own toilet tank tray, you’ll need:
- A wooden accessory tray or flower box
- Wood paint/stain
- A sharpie or paint pen.
Begin making your craft by customizing your tray. Make sure to sand your tray before applying paint or stain, then distress, paint, or stain your wooden tray/flower box to your desired look. Let completely dry before proceeding.
Next, use a sharpie or paint pen to decorate your tray with a quote or cute phrase such as “Hello Sweet Cheeks” or “Seat Yourself”. Or, if you want something more minimalistic, you can keep your tray plain. After everything is dry, your toilet tank tray is complete! All you have to do to finish your organizer is to decide how to fill it. Make your tray purely decorative and fill it with flower vases and potpourri or, on the other hand, make it extremely practical by filling it with air freshener, extra toilet paper, hand towels, a box of tissues, etc.
Upgrading your bathroom doesn’t stop at adding a charming toilet tank tray; there are many modern solutions to elevate your space. One of the best ways to enhance your bathroom experience is by considering the installation of an electric toilet. These innovative fixtures not only add a touch of luxury but also incorporate features like heated seats, adjustable water temperatures, and integrated bidet functions, providing an all-in-one solution for comfort and hygiene. Imagine transforming your everyday routine into a spa-like experience with just a touch of a button. With an electric toilet, you can ensure that your bathroom is not only functional but also a delightful retreat from the ordinary.
3. Ladder Towel Rack
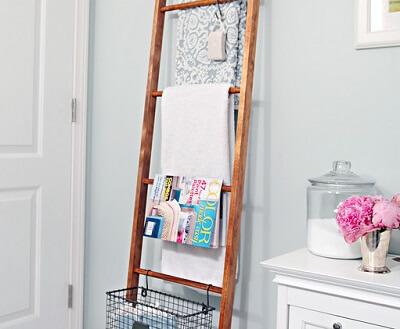
Why hang your towels normally when you can do it with style? There’s no need to crowd your towels together on a bar or shove them under your counter anymore! This decorative ladder organizer is perfect for displaying your spare towels and saves you space to store other bathroom items. There are two routes you can take with this DIY: buying or making your ladder. If you want to save time, head over to your local home improvement or craft store to pick up a wooden ladder. However, most of these ladders are made of metal and not wood, and can tend to be difficult to find in-person. Therefore, you might need to order one from an online retailer. However, if you rather create your ladder from scratch, click here for an in-depth tutorial. Once you have your ladder, whether store-bought or DIY, feel free to paint, stain, or distress your wooden ladder to your desired look. Let the ladder completely dry before displaying as you don’t want to accidentally stain any of your towels. Lean the ladder up against a blank wall or by the toilet.
4. Bathtub Caddy
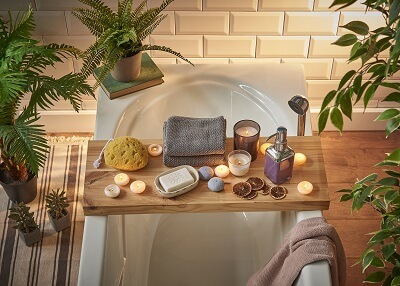 Nothing screams relaxation more than a bath, but sometimes you don’t have anywhere to put your bath accessories. So why not DIY a bathtub caddy that will give you a place to display the items you have no storage for?
To begin making your caddy, first measure your bathtub from outside edge to edge. It is better to err on the side of being slightly longer than too short as you don’t want the plank to fall into the tub. Then, decide on how wide you want the caddy to be. This is dependent on what items you want to place on your caddy. If you want to be able to fit a book, a glass of wine, your soaps, etc. all on the board, measure accordingly.
Next, go to your local home improvement store and buy a plank of 1-inch thick wood of the correct length and width. Most home improvement stores also offer free wood cutting services with your wood purchase, so give them your desired dimensions to have them cut your board to size. After your wood is cut, sand it down with an electric sander or 100 grit sandpaper to prevent any unwanted splinters.
Lastly, apply your stain to the wood in the direction of the wood grain. Follow the directions of your wood stain on how long to let the stain set before wiping off the excess. Optional: finish with a wood gloss or finishing paste to prevent any water from fading or damaging your caddy.
5. Three-Tier Decorative Stand
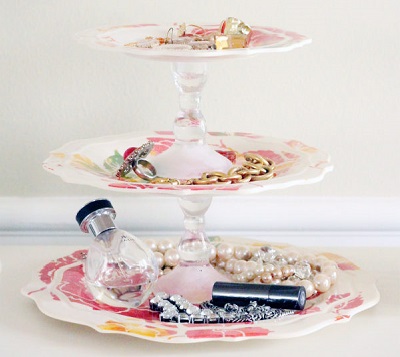
This beautiful three-tier stand is the perfect display for any jewelry, nail polish, or small bathroom items. It is also a great option if you have some empty counter space. All you need to make this DIY bathroom organizer is:
- Three plates
- Two candlestick holders
- Superglue.
The ideal size of the plates depends on the desired look. The plates can be the same size or, if you want the stand to be larger on the bottom and incrementally become smaller at the top, choose a small, medium, and large plate. Look out for sets of decorative plates, or you can opt for glass or white plates. Glass or white plates are easier to match and are harder to distinguish if they are not all from the same set.
To start, take the largest plate and find the center. Mark with a sharpie. Then, take your first candlestick and line the rim with glue. Firmly press the candlestick down onto the center of the plate. Next, take your medium plate and turn it upside down. Once again, find the center of the plate. Rim the opposite side of the previous candlestick with glue and attach it onto the second plate. Repeat the process with your last candlestick and plate until you have your finished stand (plate, candlestick, plate, candlestick, plate). Let the glue completely dry before displaying.
Be sure to post your bathroom craft creations and tag Pinspiration on social media! We can’t wait to see your creative spin in making these DIY bathroom organizers come to life.